Today, we start writing with fountain pens in my Italic handwriting calligraphy class. I've always wanted to write with one. A friend gave me several used ones last year but I could only get one to work after it was cleaned and loaded with ink. I want to learn how to write fast, create legible marks with fabulous negative spaces and counters, rhythm and crisp joins. Will writing with a fountain pen encourage me to write more? Will the beauty of the letter forms lead to a writing practice? I can hardly wait until this afternoon when we receive our new Manuscript Classic Calligraphy Set with five nibs. Oh, the anticipation of learning something new.
Monday, January 28, 2013
Monday, January 21, 2013
Repurposed Artwork for New Journal
At an art retreat in 2010, I made this accordion face book after being inspired by one that Judy Wise made and showed me. The blog post about the art retreat demonstrates how I created the pages with collage, tracing paper faces and painted backgrounds.
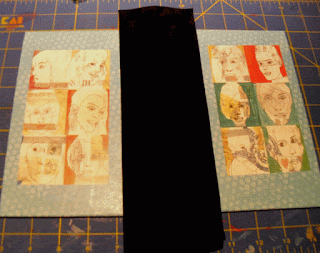
I decided to use these faces in a journal I'm making. I scanned each face and made a montage of the faces in Photo Shop. One for the front cover and another for the back cover.
I cut a strip of black suede paper to cover the spine of the book and ran it through the Xyron machine, too.
For inside the book cover, I glued the background paper using the same method. The bone folder helps to seal the adhesive.
The book cover is now ready for its paper signatures. First, I have to decide how the book is to be used. If water media will be used, the signature pages need to be a paper that takes water well, watercolor paper for example. If I plan to draw and sketch in the book without water media, I'll make the signatures out of drawing paper.
I'll bind the signatures into the journal like I did for my Oaxaca, Mexico travel journal seen HERE. The same method was used to make this travel journal. I used fabric vs. paper for the book cover.
I decided to use these faces in a journal I'm making. I scanned each face and made a montage of the faces in Photo Shop. One for the front cover and another for the back cover.
I re-sized the photo montage and added a scanned background. Then I took the front and back cover papers to FedEx to make color copies. The laser copies last longer than the ink jet copies.
I'd already purchased a hard bound book at the Dollar Store, cut out the text block with an X-acto knife.
The Xyron machine adds a permanent adhesive to the back and makes it easy to glue to the book cover.
Here both the front and back covers are glued to the hardback cover.
I cut a strip of black suede paper to cover the spine of the book and ran it through the Xyron machine, too.
For inside the book cover, I glued the background paper using the same method. The bone folder helps to seal the adhesive.
The book cover is now ready for its paper signatures. First, I have to decide how the book is to be used. If water media will be used, the signature pages need to be a paper that takes water well, watercolor paper for example. If I plan to draw and sketch in the book without water media, I'll make the signatures out of drawing paper.
I'll bind the signatures into the journal like I did for my Oaxaca, Mexico travel journal seen HERE. The same method was used to make this travel journal. I used fabric vs. paper for the book cover.
at
10:52 AM

Wednesday, January 9, 2013
Italic Handwriting Class Portfolio
Monday, I started an italic handwriting class at Multnomah Arts Center. We'll be writing lots of text about creativity to practice with the adage- increased quantity leads to better quality. I wanted to make a portfolio to hold my text writings.
The cover is painted muslin fabric using acrylics and stencils.
I glued the muslin to cut foam core with matte medium.
The inside covers are covered with some paper from Korea. Red duck tape connects the front and back.
On the cover, I used a C-O nib and white Windsor & Newton calligraphic ink to write the word 'Creativity' in large letters.
The other words I wrote in a white Sakura Gelly Roll pen for 'Winter 2013' and a C-4 nib with the white ink for 'italic handwriting'.
Now, I'm off to practice, practice, practice.
The cover is painted muslin fabric using acrylics and stencils.
I glued the muslin to cut foam core with matte medium.
This is what the back looked like when I finished gluing.
The inside covers are covered with some paper from Korea. Red duck tape connects the front and back.
On the cover, I used a C-O nib and white Windsor & Newton calligraphic ink to write the word 'Creativity' in large letters.
The other words I wrote in a white Sakura Gelly Roll pen for 'Winter 2013' and a C-4 nib with the white ink for 'italic handwriting'.
Now, I'm off to practice, practice, practice.
at
3:31 PM

Subscribe to:
Comments (Atom)


